Powerful Solutions For Business Growth
A fiber optic termination box (FTB) is the last point in an FTTH or FTTB network before the signal reaches the subscriber. When it is installed correctly, the box protects your fiber cables, keeps insertion loss below 0.3 dB per connection, and gives the network a long, trouble-free service life. When it is installed poorly, you get signal loss, water damage, and return visits that cost more than the box itself.
This guide covers every step in plain, direct language. It is written by the engineering team at Glory Optical Communication - a fiber optic component manufacturer based in Ningbo, China, with 15+ years of experience and 1,200+ completed FTTH projects across 60+ countries.
1. Before You Start: Choose the Right Box and Gather Your Tools
Before you open a cable or touch a splice tray, two things must be right: the box must match the environment where it will be installed, and every tool must be at the worksite. Stopping mid-job to find a missing tool is a common reason technicians skip the connector inspection step - which causes 90% of post-installation signal failures.
1.1 Choose the Right IP Rating for the Site
IP rating is the most important spec for any outdoor fiber termination box. It tells you how well the enclosure resists dust and water. The rating is defined by IEC 60529 / EN 60529.
|
IEC 60529 / EN 60529: International standard that defines IP (Ingress Protection) ratings. First digit (0–6) = dust protection level. Second digit (0–8) = water protection level. Both digits must match the site conditions.
|
|
Site Environment |
Recommended IP |
What That IP Level Means (IEC 60529) |
Glory Series |
|
Indoor equipment room (dry) |
IP54 |
Dust-protected + splash from any direction |
Indoor Wall-Mount |
|
Indoor basement or riser (damp) |
IP55 |
Dust-protected + water jets from any direction |
Indoor Wall-Mount |
|
Outdoor wall or pole (open rain) |
IP65 |
Dust-tight + water jets at 6.3 L/min from 3 m for 15 min |
Outdoor Wall/Pole |
|
Underground vault or flood zone |
IP68 |
Dust-tight + submersion - Glory spec: 1 m depth / 72 h |
Outdoor IP68 Series |
|
Coastal or salt-air site |
IP68 + salt spray |
Same as above + 96 h salt spray test (IEC 60068-2-11) |
Outdoor IP68 Marine |
|
⚠ Important: Do not rely on a manufacturer's self-declared IP rating. Ask for a third-party test report from SGS or TÜV. Glory provides IP test reports for every outdoor series. Field data from 1,200+ installed Glory outdoor units in Southeast Asia (2022–2025): zero water ingress in IP68 units; 3.2% seal issues in IP65 units in high-humidity tropical zones after 24 months - all traced to under-torqued cable glands, not housing failure. |
1.2 Gather Every Tool Before You Start
Set out all tools before opening any cable. A missing tool mid-job is the most common reason technicians skip the connector inspection step.
|
Tool |
What It Does |
Standard / Spec to Meet |
|
Fusion splicer |
Joins fiber ends with near-zero insertion loss |
Target IL ≤ 0.05 dB per splice (IEC 61300-3-4) |
|
Fiber cleaver |
Cuts fiber at ≤ 0.5° angle before splicing |
Angle > 1° gives IL > 0.1 dB - replace blade when worn |
|
Fiber stripping tool |
Removes coating without scratching fiber |
Three-step strip: jacket → 900 µm buffer → 250 µm coating |
|
Fiber scope (200× minimum) |
Inspects connector endfaces before insertion |
Required by IEC 61300-3-35; use before every mating |
|
OLTS (power meter + source) |
Measures insertion loss of the completed link |
IEC 61280-4-1 (singlemode) / IEC 61280-4-2 (multimode) |
|
OTDR tester |
Captures baseline trace and locates faults |
IEC 61280-4-3 - save .SOR file at handover |
|
Cable gland torque wrench |
Tightens glands to spec - prevents IP seal failure |
Glory PG-series glands: 2.5–3.5 Nm |
|
IPA wipes + one-click cleaner |
Cleans fiber ends and adapter sleeves |
Clean before every inspection and mating - no exceptions |
|
Cable tie + Velcro straps |
Secures fiber coils inside the tray |
Minimum coil diameter: 60 mm - never over-tighten Velcro |
|
M6 torque driver |
Mounts box to wall or pole |
Min 50 mm anchor depth into concrete |
2. The 8 Installation Steps
The steps below apply to wall-mount and pole-mount FTBs used in FTTH and MDU networks. Rack-mount installations follow the same splice and test steps but skip Steps 3–4.
Step 1 - Mount the Enclosure
Wall mount
Mark the four anchor hole positions using the paper drilling template included with the box. Drill M6 holes to a minimum depth of 50 mm into concrete or masonry. Use anchor bolts with expansion sleeves - not plastic plugs - for outdoor masonry.
Keep the box level to within ±2°. A tilted tray causes fiber to rest against one side of the radius guide and adds micro-bending stress over time. Leave a minimum of 300 mm clear space below the box so the drop cable can enter with a smooth bend.
Pole mount
Use the stainless steel band clamps supplied with the box. Fit the anti-vibration rubber liner between the clamp and the pole before tightening. Tighten both clamps evenly - uneven torque creates a twisting force that can distort the IP gasket over time.
Mount the box at a minimum height of 2.5 m from the ground. This is the minimum clearance for outdoor ODN equipment recommended by ITU-T L.37.
|
⚠ Important: Do not mount the box with the cable entry ports pointing upward. Water tracks along the cable jacket and enters the gland thread. Point cable entries downward or sideways. |
Step 2 - Prepare and Route the Drop Cable
Strip the cable jacket for 150–200 mm. Do not nick the buffer tube or fiber coating when cutting. Keep the steel strength member intact - it attaches to the strain relief clamp inside the box and takes all pull force away from the fiber.
Route the cable into the box through the cable entry port. Leave 1.5 m of fiber slack inside the box. This slack coils into the storage ring and gives enough length to re-splice if a splice fails inspection later.
Step 3 - Seal the Cable Entry (Critical for IP65/IP68)
This step is where most IP failures start. The cable gland must match the outer diameter (OD) of your cable. Use the gland size chart on the box label or in the product datasheet.
Select the correct gland size for the cable OD. A gland that is too large for the cable will not seal, even when fully tightened.
Thread the cable through the compression nut and gland body before the gland is screwed into the box. Forgetting this step means pulling the cable back out.
Thread the gland into the box port. Hand-tighten first, then use the torque wrench to reach 2.5–3.5 Nm (for Glory PG-series glands). Do not over-tighten - it cracks the PG thread.
For IP68 sites: pressurize the sealed box to 0.2 bar using a hand pump and hold for 60 seconds. Submerge in a bucket of water. No bubbles = good seal.
Step 4 - Strip and Clean the Fiber
Work on a clean, flat surface. Fiber particles are invisible and sharp. Keep used fiber fragments in a sealed container - do not let them fall on the workbench or floor.
Strip in three steps: (1) remove the outer jacket, (2) strip the 900 µm buffer tube, (3) strip the 250 µm coating. Wipe the bare fiber with a dry IPA wipe to remove coating residue.
Cleave the fiber with a clean blade. Target angle: ≤ 0.5°. A blade with more than 5,000 cuts gives inconsistent angles. Replace on a scheduled cycle, not just when it looks worn.
Inspect the cleaved end under the cleaver's camera or a fiber scope. Reject any end with a lip, crack, or angle greater than 1°.
|
⚠ Important: Do not blow on bare fiber to clean it. Moisture from breath deposits oil on the surface and increases insertion loss. Use IPA wipes only. |
Step 5 - Fusion Splice the Fiber into the Splice Tray
Place the heat-shrink protection sleeve onto one fiber before loading both fibers into the splicer clamps. Forgetting the sleeve means you must cut and re-splice.
Load both fibers and run the automatic alignment and splice program. Most splicers show an estimated insertion loss on screen.
Accept splices with IL ≤ 0.05 dB. If the splicer shows IL > 0.1 dB, cut the splice and redo it. Do not accept a marginal splice and hope the result stays in spec after the heat shrink is applied.
Center the heat-shrink sleeve over the splice and move it to the heating oven. Heat for at least 60 seconds at 190°C. Check: no bubbles, no exposed bare fiber at either end.
Place the completed splice into the splice tray slot. Lay the heat-shrink tube flat and parallel to the tray surface. Do not stack sleeves on top of each other.
Repeat for every fiber. Most FTBs hold 1–4 splice trays. Each tray holds 12–24 splices depending on the model.
Step 6 - Route Pigtails and Insert Connectors
6a - Route pigtails from splice tray to adapter panel
Guide each pigtail from the splice tray through the routing channels to the adapter panel. Use the pre-formed radius guides. Do not pull the pigtail tight. There must be a loose, natural arc - no sharp bends.
Coil any excess pigtail length in the fiber storage ring. Secure the coil with a Velcro strap, not a cable tie. A tight cable tie can crush the fiber coating and create a micro-bend loss point. Minimum coil diameter: 60 mm.
6b - Inspect every connector before insertion
Use a fiber scope at 200× magnification. Follow the inspect–clean–inspect protocol:
Inspect the endface before any cleaning.
If not Grade A: use a one-click cleaner, then a dry IPA lint-free wipe.
Inspect again. If still not Grade A after two clean cycles: the connector has a physical defect and must be replaced, not re-cleaned.
Insert each cleaned connector into its adapter. SC/APC connectors click in with one push. If the connector does not seat, check for dust in the adapter sleeve and clean it with a stick cleaner.
Step 7 - Label All Ports
Label every port before closing the box. Unlabeled ports cause wrong-fiber disconnections during maintenance, which lead to network outages.
Use self-laminating labels rated for the temperature range of the site. Plain paper labels inside an IP65/IP68 box will not survive condensation or heat cycles.
Label format: [Port ID] - [Circuit ID] - [Destination]. Example: P-04 - MDU-B3-UNIT12 - OLT-PORT-07.
For large deployments: QR-coded labels allow technicians to pull up circuit records from a phone. Glory provides QR-label services on OEM orders.
Step 8 - Test and Record
Do not close the box and leave the site without two completed tests: an insertion loss measurement and an OTDR trace. These tests prove the installation is correct and give you a baseline for all future fault finding.
8a - Insertion loss test (OLTS method)
Connect a calibrated launch cable from the optical source. Connect a power meter at the far end. Measure end-to-end insertion loss. Subtract the reference cable loss to get the link loss.
|
Connection Point |
TIA-568.3-E Max Allowed IL |
Glory Premium Target |
|
Mated adapter pair (SC) |
0.75 dB |
≤ 0.30 dB |
|
Mated adapter pair (LC) |
0.75 dB |
≤ 0.25 dB |
|
Fusion splice (per splice) |
0.30 dB |
≤ 0.05 dB |
|
Full FTB link end-to-end |
Per OLTS baseline |
Flag any value > 0.5 dB for review |
|
⚠ Important: If any connector shows IL > 0.3 dB during the OLTS test, do not accept the link. Remove the connector, re-inspect under the fiber scope, clean, and test again. A bad connector that passes today will degrade further and cause an outage within months. |
8b - OTDR baseline trace
Set the OTDR wavelength to match the network: 1310 nm and 1550 nm for singlemode GPON. Use a 100–200 m launch cable to get past the OTDR dead zone (typically 10–20 m) so the first splice at the FTB entry is visible on the trace.
Save the trace file in Bellcore .SOR format immediately after the test. Record the filename against the port ID in your project documentation. This trace is your fault-finding reference for the full life of the network.
|
OTDR Event Type |
Flag Threshold |
Action if Exceeded |
|
Splice event (reflective loss) |
> 0.10 dB |
Re-splice and retest |
|
Connector reflectance (SC/APC) |
> −45 dB ORL |
Clean connector, retest; replace if it persists |
|
Connector reflectance (SC/UPC) |
> −35 dB ORL |
Clean connector, retest; replace if it persists |
|
Unexpected reflection (kink or break) |
Any non-splice reflection event |
Find and fix the physical damage |
3. Common Installation Mistakes (and How to Avoid Them)
The table below comes from Glory's analysis of returned units, field support calls, and customer feedback from projects in Southeast Asia, Africa, and Europe between 2021 and 2025. These are real failure modes from real deployments.
|
Mistake |
What Goes Wrong |
How to Prevent It |
|
Under-torqued cable gland |
IP seal fails; water enters box; fiber corrodes or breaks |
Use a torque wrench to the manufacturer's spec (2.5–3.5 Nm for Glory PG glands) |
|
Wrong gland size for cable OD |
Seal does not compress around the cable; water enters even if fully tightened |
Measure cable OD with a caliper; match to the gland size chart in the product datasheet |
|
Fiber coil < 30 mm radius in tray |
Bending loss of 0.3–1.5 dB added per fiber; signal degrades over time |
Use the built-in 30 mm radius guides; never force excess fiber into a tight coil |
|
Skipping connector inspection |
Contaminated connectors add 0.5–2 dB loss or block signal; cause 90% of post-install outages |
Inspect every endface at 200× (IEC 61300-3-35) before insertion - every time, no exceptions |
|
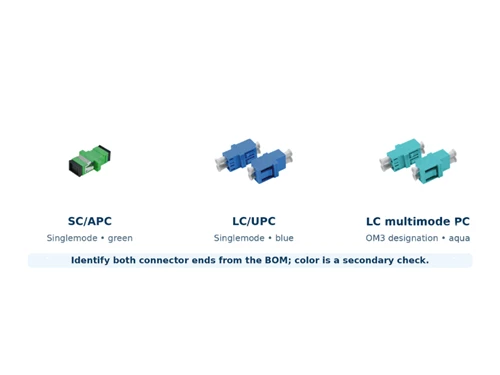
Mixing SC/APC (green) with SC/UPC (beige) adapters |
Return loss drops from ≥ 60 dB to < 30 dB; GPON OLT raises alarms or drops signal |
Color-code strictly: SC/APC = green; SC/UPC = beige or blue. Never mix in the same link |
|
No OTDR baseline trace saved |
Future faults cannot be separated from original installation losses; troubleshooting takes 3–5× longer |
Capture and file the OTDR trace at handover - it is a permanent record, not optional |
|
Cable tie over-tightened on fiber coil |
Micro-bend stress at the tie point; loss increases slowly over weeks |
Use Velcro straps on fiber coils inside the box; never use standard cable ties directly on fiber |
|
Cable entry ports pointing upward |
Water tracks along the jacket and enters the gland thread regardless of gland torque |
Mount the box with cable entry ports facing downward or sideways - check before drilling |
4. Specific Scenarios: MDU Buildings and 5G Sites
4.1 Port Count Planning for MDU Buildings
Port count is the most frequently misjudged variable in MDU fiber projects. Under-ordering is the top reason for re-orders: Glory data from 200+ MDU FTTH projects in Africa and Southeast Asia (2021–2025) shows 72% of re-orders were caused by underestimating port count at the design stage.
|
Building Type |
Recommended Box |
Port Count Rule |
Where to Mount |
|
Single house |
4-port wall-mount (IP54) |
4 ports |
Interior wall, near ONT |
|
Low-rise apartment (≤ 12 units) |
12-port wall-mount (IP54) |
1 port per unit + 20% buffer → round up to nearest 4 |
Riser or IDF closet per floor |
|
Mid-rise (13–48 units) |
24-port wall-mount or 2× 12-port |
1 port per unit + 20% buffer |
Per-floor telecom room |
|
High-rise (49+ units) |
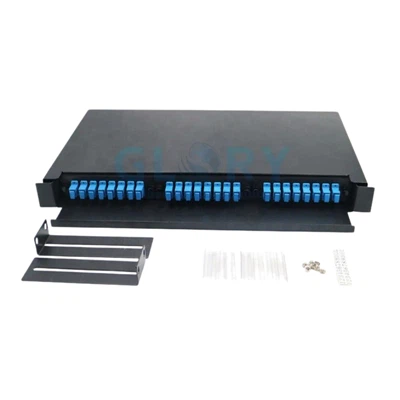
48-port 1U rack-mount |
48–96 ports; one IDF per floor for buildings over 10 floors |
Main MDF + per-floor IDF |
|
Outdoor building entry |
24-port IP65 or IP68 wall-mount |
24 ports with 20% reserve |
Exterior wall or underground vault |
|
✔ Glory tip: Add 20% overcapacity to every port count calculation. It costs almost nothing at design time. Adding ports after the network is live means returning to site, buying more hardware, re-routing cables, and re-testing the whole distribution layer. |
4.2 Installing FTBs at 5G Backhaul Sites
5G macro cell sites typically need one 24-port outdoor IP68 FTB at the base station equipment room, plus smaller 4-port micro-enclosures at street-level small cell mounts. Fronthaul fiber links must hold end-to-end insertion loss to ≤ 0.3 dB per span, so connector quality is not negotiable at 5G sites.
Use SC/APC connectors only on 5G fronthaul links. SC/UPC return loss (≥ 50 dB) is not enough for the optical budgets of some 5G radio units.
At pole-mounted small cells, use an IP67 or IP68 micro-enclosure with a locking hasp. Roadside enclosures are a target for theft and vandalism.
Run the OTDR trace on every fronthaul fiber span at both 1310 nm and 1550 nm. 5G network operations teams require baseline documentation for SLA reporting.
5. Optical Performance Specs for Acceptance Testing
The table below shows the key performance figures that a correctly installed Glory FTB should meet. Use these numbers as your pass/fail criteria on site.
|
Parameter |
Glory Specification |
Industry Benchmark |
Standard |
|
Fusion splice insertion loss |
≤ 0.05 dB (typical) |
≤ 0.10 dB |
IEC 61300-3-4 |
|
SC adapter insertion loss |
≤ 0.30 dB |
≤ 0.50 dB (TIA maximum) |
IEC 61754-4 |
|
LC adapter insertion loss |
≤ 0.25 dB |
≤ 0.50 dB (TIA maximum) |
IEC 61754-20 |
|
Return loss - SC/APC |
≥ 60 dB |
≥ 55 dB |
IEC 61300-3-6 |
|
Return loss - SC/UPC |
≥ 50 dB |
≥ 45 dB |
IEC 61300-3-6 |
|
Minimum bend radius in tray |
30 mm |
30–40 mm |
ITU-T G.657 |
|
Operating temperature range |
−40 °C to +70 °C (outdoor) |
−20 °C to +60 °C |
IEC 60068-2-14 |
|
IP rating - outdoor series |
IP65 or IP68 (by series) |
IP65 minimum for outdoor use |
IEC 60529 |
6. Frequently Asked Questions
The questions below come from the most common searches by engineers and ISP buyers. They also appear in Google's 'People Also Ask' results for fiber optic termination box topics.
Q1: What is a fiber optic termination box used for?
A fiber optic termination box is an enclosure at the subscriber end of an FTTH or FTTB network. It protects the fusion splices where the feeder cable meets individual drop cables. It holds the pigtails that connect to patch cords going to the ONT. It keeps fiber coils at a safe bend radius so signal loss stays low. In short: it is the last protected point before the fiber enters the subscriber's home or room.
Q2: What is the difference between IP65 and IP68 for a fiber termination box?
Both ratings come from IEC 60529. IP65 = fully dust-tight and protected against water jets from any direction, tested at 6.3 L/min from 3 m for 15 minutes. IP68 = fully dust-tight and protected against continuous submersion - Glory's IP68 spec is 1 m depth for 72 hours. Use IP65 for pole or wall-mount outdoor sites. Use IP68 for underground vaults, cable pits, or flood-prone FTTH access points.
Q3: What causes signal loss inside a fiber termination box?
Four causes account for almost all post-installation signal loss inside an FTB. (1) Dirty or damaged connector endfaces - the most common cause by far, responsible for about 90% of field outages. (2) Fiber bent tighter than the minimum 30 mm radius inside the splice tray. (3) A fusion splice with a cleave angle error greater than 1° or a bubble in the heat-shrink sleeve. (4) A mismatched adapter type - an SC/APC connector inserted into an SC/UPC adapter raises reflectance and triggers alarms on GPON systems.
Q4: How do I choose the right IP rating for my site?
Start with the environment. Indoor and dry = IP54. Indoor and damp = IP55. Outdoor in open rain = IP65. Underground or flood risk = IP68. Coastal or salt air = IP68 plus a salt spray test certificate. If you are unsure, go one level higher. The price difference between IP65 and IP68 is small. One water-damaged network outage costs far more.
Q5: How do you test a fiber termination box after installation?
Run two tests. First: an OLTS insertion loss test per IEC 61280-4-1. Connect a calibrated source at the input and a power meter at the output. Acceptable loss per adapter: ≤ 0.75 dB (TIA maximum) or ≤ 0.30 dB (Glory target). Second: an OTDR baseline trace per IEC 61280-4-3. Save the .SOR file against the port ID in your project record. The OTDR trace is your permanent reference for all future maintenance. Do not leave the site without it.
Q6: What is the minimum bend radius for fiber inside a splice tray?
30 mm is the standard minimum for G.652.D single-mode fiber (per ITU-T G.657). Bend-insensitive G.657.A2 fiber can go down to 7.5 mm, but Glory designs all splice trays to enforce 30 mm as the minimum to protect all fiber types and avoid long-term fatigue. Never coil excess fiber tighter than 60 mm diameter (30 mm radius) inside the box.
Q7: What HS code applies to fiber optic termination boxes for import?
Most fiber optic termination boxes are imported under HS Code 8536.90 (electrical apparatus for switching, protecting, or connecting electrical circuits) or 9001.90 (optical fiber elements and bundles). The correct code depends on the specific product composition. Glory provides a customs documentation package with every export order: an HS code recommendation letter, certificate of origin, commercial invoice template, and packing list. Contact sales@gloryoptics.com for pre-shipment documentation support.
Q8: Can I get custom OEM fiber termination boxes from Glory?
Yes. Glory provides full OEM and ODM services: custom mold development (25–35 day lead time for aluminum prototype mold), custom colors with RAL or Pantone matching, logo engraving or label printing, and custom retail packaging. Standard catalog MOQ: 100 pcs. Custom mold orders: 500 pcs minimum. Free samples of 1–5 units are available for qualified B2B buyers. Send your drawing or spec sheet to sales@gloryoptics.com - the engineering team replies within 48 hours.
About the Author
This guide was written by the engineering and product team at Ningbo Glory Optical Communication Co., Ltd. - a fiber optic component manufacturer based in Ningbo, China, founded in 2009. Glory makes a full range of fiber termination boxes, splice closures, fiber optic cables, patch cords, and PLC splitters. Products ship to 60+ countries. The factory holds ISO 9001:2015 certification and produces over 5 million FTB units per year across 30+ production lines.
For product specs, free samples, OEM inquiries, or technical questions on your specific project: sales@gloryoptics.com | WhatsApp: +86 138 5833 6450 | gloryoptics.com
|
Standards referenced in this article: IEC 60529, IEC 61073-1, IEC 61300-3-4, IEC 61300-3-6, IEC 61300-3-35, IEC 61280-4-1, IEC 61280-4-2, IEC 61280-4-3, IEC 60068-2-11, IEC 60068-2-14, IEC 60793-2-50, ITU-T G.657, ITU-T L.37, TIA-568.3-E, TIA-606-C. All performance data is based on Glory factory test records and field deployment reports current as of March 2026. |